What Are Core Web Vitals?
Core Web Vitals Optimization plays a crucial role in improving website performance and SEO rankings. Core Web Vitals are a set of user experience metrics defined by Google that assess how fast, stable, and interactive a webpage is for visitors. Optimizing these metrics helps enhance user engagement and search visibility. The three key Core Web Vitals are:
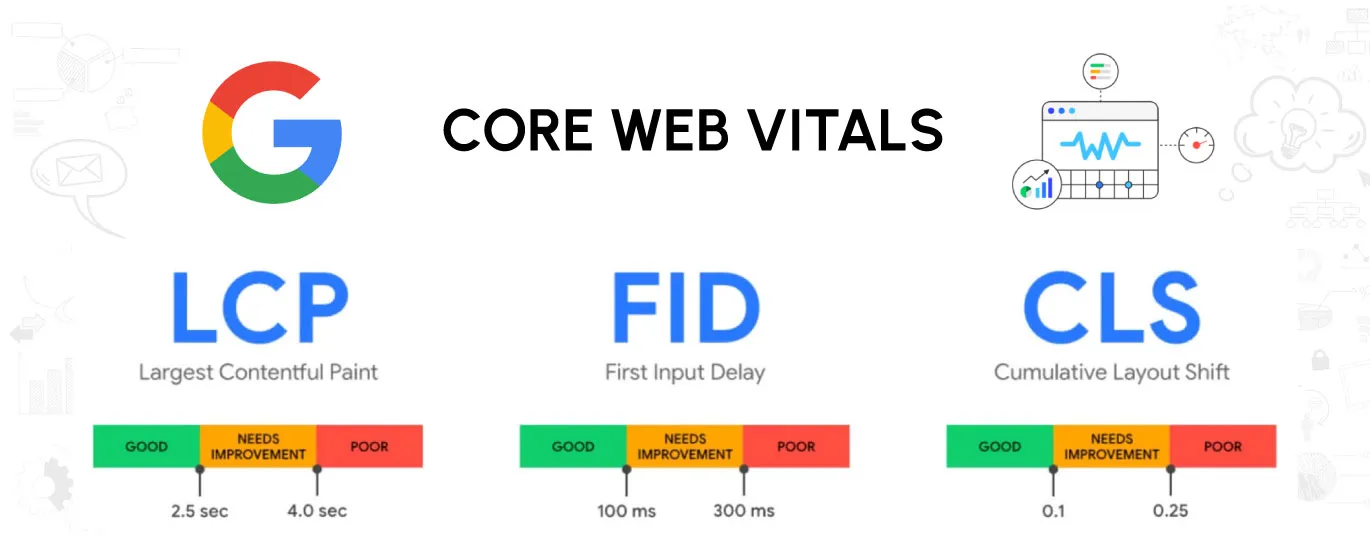
- Largest Contentful Paint (LCP) – Measures the time it takes for the largest visible element (such as an image or text block) to load on the screen. The ideal time is under 2.5 seconds.
- First Input Delay (FID) – Measures the time between a user’s first interaction (such as clicking a button or link) and the browser’s response. The ideal time is under 100 milliseconds (ms).
- Cumulative Layout Shift (CLS) – Measures how much elements move unexpectedly on a page while loading, causing a jarring user experience. The ideal CLS score is under 0.1.
If your WordPress website struggles with these, follow this step-by-step guide to optimize your site effectively.
Step-by-Step Guide to Core Web Vitals Optimization in WordPress
Step 1: Analyze Your Core Web Vitals Score
Before making improvements, check your website’s current performance using:
- Google PageSpeed Insights (pagespeed.web.dev) – Provides Core Web Vitals scores and optimization suggestions.
- Google Search Console (Core Web Vitals Report) – Monitors performance issues across your website.
- GTmetrix (gtmetrix.com) – Measures loading speed and highlights issues slowing down your site.
Identify which Core Web Vital needs improvement.
Step 2: Improve Largest Contentful Paint (LCP)
LCP issues occur due to slow-loading images, bloated themes, or server response time. Here’s how to fix them:
1. Optimize Your Hosting & Server Performance
✅ Use a fast hosting provider like Cloudways, Kinsta, or SiteGround, which provide better speed and uptime.
✅ Enable server-side caching (storing frequently accessed data to reduce load time) with Redis or Memcached. (Server-side caching means storing frequently requested data on the server side (such as database queries, API responses, etc.) so the server doesn’t have to process them again every time a user visits your website.)
✅ Reduce Time to First Byte (TTFB) (the time the server takes to send the first byte of data) by using a premium DNS like Cloudflare.
2. Optimize Images for Faster Loading
✅ Use modern image formats like WebP, which are smaller yet high-quality alternatives to PNG/JPG.
✅ Compress images using plugins like ShortPixel or Smush to reduce file sizes without losing quality.
✅ Implement lazy loading (delays loading images until needed) using plugins like WP Rocket.
3. Minimize Render-Blocking Resources
✅ Defer JavaScript execution (postpone non-essential scripts) using WP Rocket.
✅ Load critical CSS first (ensures above-the-fold content loads quickly) using Autoptimize.
✅ Remove unused CSS with Perfmatters to avoid unnecessary styling rules slowing down your site.
4. Implement a Content Delivery Network (CDN)
A CDN (Content Delivery Network) speeds up your website by delivering content from servers closer to the user. Try:
- Cloudflare (free & premium options, speeds up global access)
BunnyCDN (affordable & high-speed alternative)
Step 3: Reduce First Input Delay (FID) for Better Responsiveness
FID is affected by excessive JavaScript execution, meaning the browser is too busy processing scripts to respond quickly. Reduce delays by following these steps:
1. Reduce JavaScript Execution
✅ Enable “Delay JavaScript Execution” in WP Rocket to prevent unnecessary scripts from blocking interactivity.
✅ Minify (remove unnecessary spaces and characters) and combine JavaScript files using Autoptimize.
✅ Remove unused third-party scripts (like old tracking codes or social media widgets) that slow down interactivity.
2. Optimize WordPress Plugins
✅ Avoid bloated plugins—keep only essential ones to reduce unnecessary processing.
✅ Replace heavy page builders (like Elementor or WPBakery) with lightweight alternatives such as GenerateBlocks.
3. Enable Browser Caching
✅ Store frequently accessed files on users’ browsers to reduce loading time for returning visitors.
✅ Use caching plugins like WP Rocket or W3 Total Cache to automate this process.
Step 4: Fix Cumulative Layout Shift (CLS) for Visual Stability
A high CLS score means page elements shift unexpectedly while loading, frustrating users. Here’s how to fix it:
1. Set Image & Video Dimensions
✅ Define width and height attributes in HTML/CSS for images and videos to prevent shifting.
✅ Use responsive image loading with WP Rocket to ensure proper placement.
2. Use Preloaded Fonts
✅ Host fonts locally to avoid delays caused by fetching them from external sources.
✅ Add font-display: swap; in CSS to prevent layout shifts caused by missing fonts.
3. Reserve Space for Ads & Embeds
✅ Define fixed dimensions for banners, ads, and iframes to prevent them from shifting existing content.
✅ Avoid injecting dynamic content (such as auto-loading ads) above existing elements.
Step 5: Optimize Overall WordPress Performance
1. Reduce TTFB (Time to First Byte)
✅ TTFB is the time taken by a server to send the first byte of data in response to a request. Reduce it by using high-performance web servers like LiteSpeed or Nginx.
✅ Optimize database queries (reduce unnecessary stored data) using WP-Optimize to speed up responses.
2. Implement Gzip & Brotli Compression
✅ Gzip & Brotli Compression are methods that reduce file sizes before they are sent to the user’s browser, improving loading speed. Enable these via .htaccess (a configuration file on web servers) or Cloudflare settings.
✅ Use WP Rocket, a caching plugin, to automate file compression.
3. Use Lightweight WordPress Themes
✅ Choose themes that are coded for performance and don’t add unnecessary scripts. Examples: Astra, GeneratePress, or Kadence.
4. Limit External Requests
✅ Reduce loading time by minimizing external requests, such as third-party fonts, tracking scripts, and social media widgets that fetch data from other websites.
Step 6: Monitor & Maintain Core Web Vitals
After implementing these optimizations, regularly monitor your website’s performance to keep it running smoothly.
🔹 Check scores using Google PageSpeed Insights & GTmetrix to track improvements.
🔹 Monitor Google Search Console for Core Web Vitals warnings and resolve issues as they appear.
🔹 Perform routine site audits with tools like WebPageTest to stay ahead of any performance drops.
Final Thoughts: Take Action & Improve Your Rankings
By following this step-by-step guide, your WordPress website will load faster, provide a better user experience, and rank higher on Google.
Need Professional SEO Services in Delhi?
If you need expert help optimizing your website’s Core Web Vitals and Technical SEO, our team at Arrowpace specializes in SEO Services in Delhi. Let’s take your website to the next level! 🚀 Contact us today!